Help Center - Articles Detail
Creating Your First Website
Using AI?
To ensure that you have the best experience while using XWEB.HOST,
please review the following Steps
How to Access Your WordPress Website
To ensure that you have the best experience while using XWEB.HOST, It’s essential to understand the steps and setup that support optimal performance. These steps are designed to help users avoid common issues and leverage the full potential of our platform. Below, you will find a comprehensive breakdown of the necessary Steps,, so you can set up your First Website effectively.
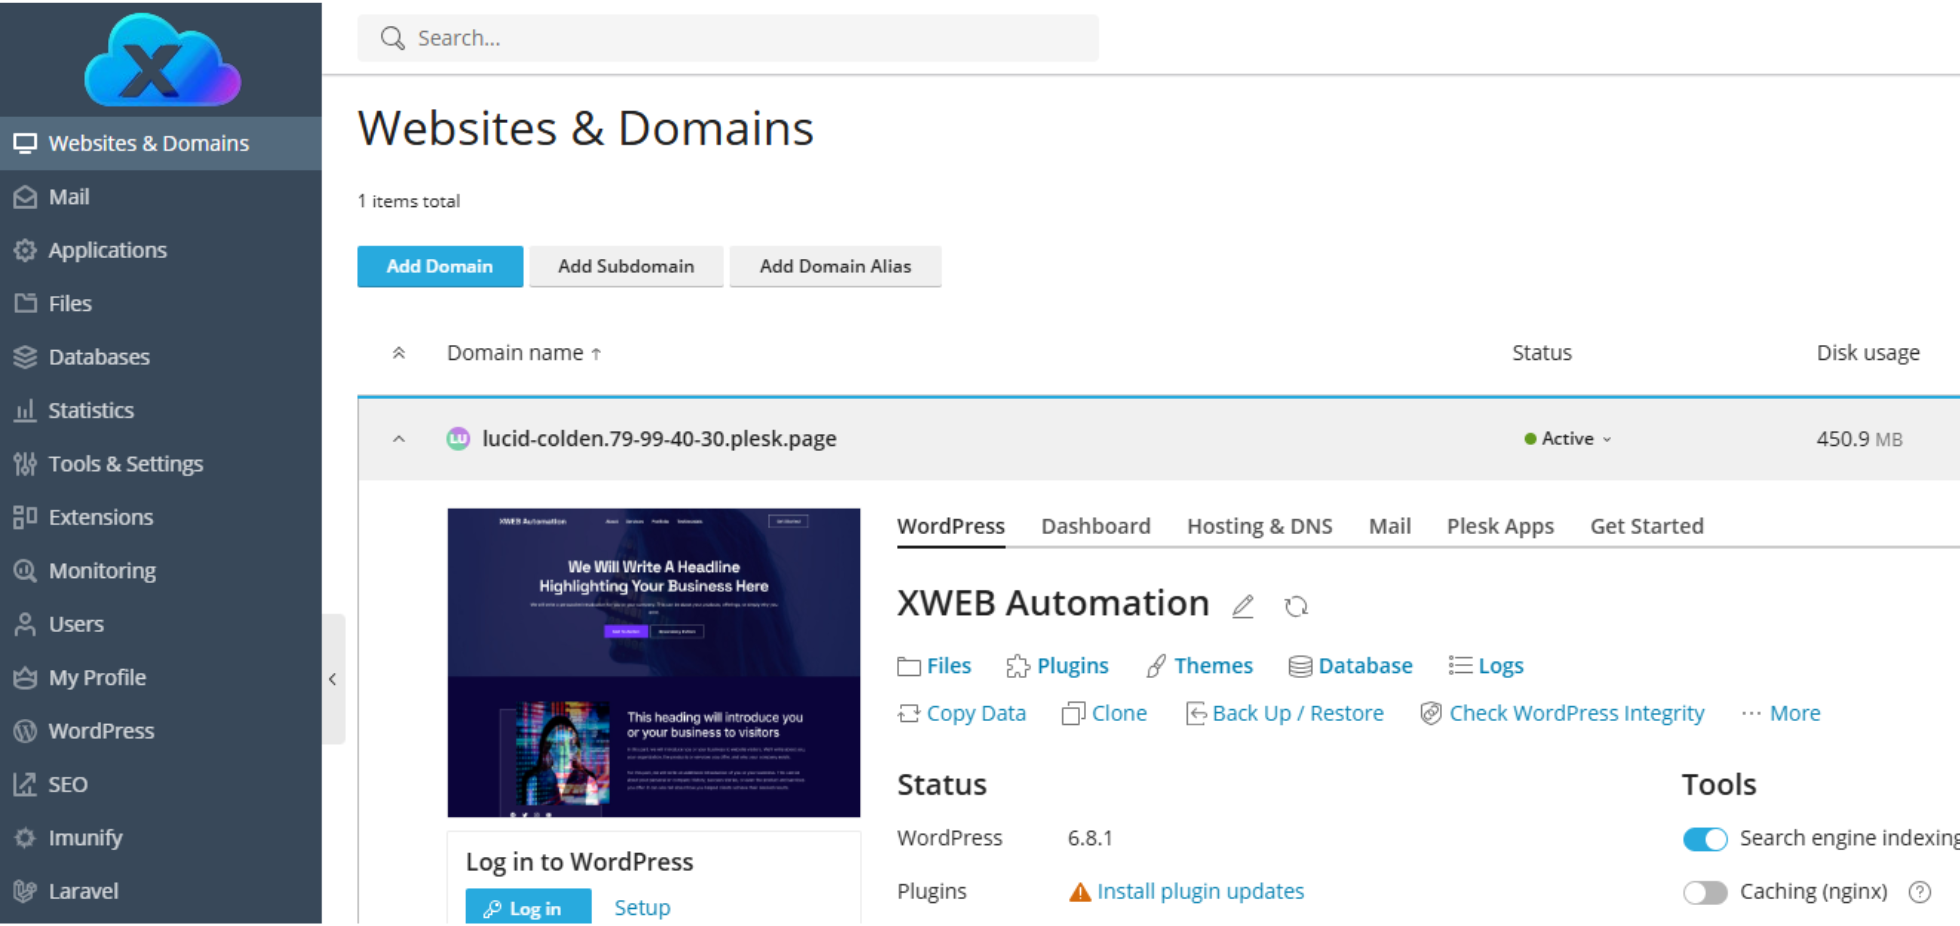
Step 1: Log in to Your Hosting Control Panel
Open your browser and go to your XWEB.HOST’s control panel login page.
Enter your username and password to log in.(Please check your inbox; the details have been sent to your email address.)
-
Locate WP Toolkit : look in the left sidebar/under Websites & Domains.
stable release. -
Find Your WordPress Installation : Click the "Log in" button next to the WordPress site.
-
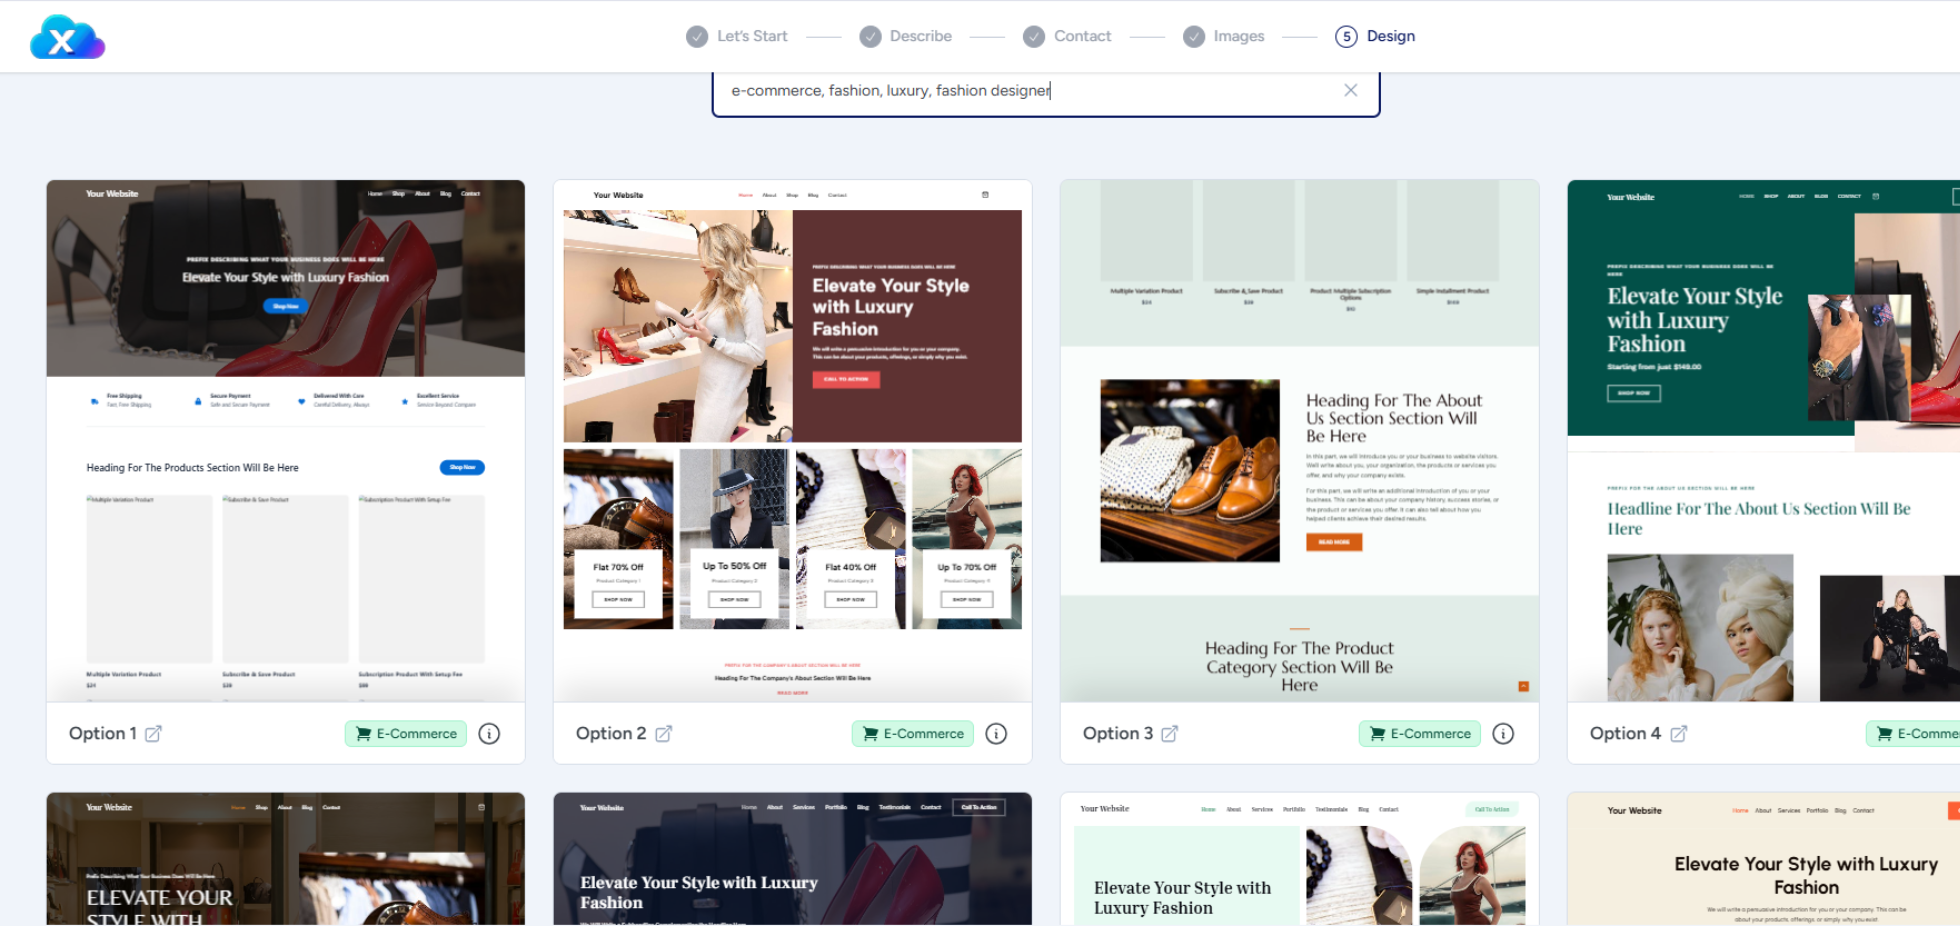
XWEB.HOST AI Builder : when you login for the first time, Answer a few prompts about your business.
-
Let XWEB.HOST work its magic : generating layouts, content, and images.
General Setup
When you log in to your website for the first time, the AI Builder and onboarding process will launch automatically.
You’ll be guided through a few quick questions about your business. To help the AI generate a strong first draft. Once the AI creates your initial site, all that’s left is to add your personal touch
.
Customization is completely up to you—you can fine-tune every detail using simple drag-and-drop tools.
be sure to include:
-
What you're selling : Provide a brief description of your product or service.
-
Where you're selling : whether you operate online or in-store, and if you offer a subscription model
-
Who you are : A brief description of your company and background information.
Images and layout
We’re combining the power of cutting-edge AI with the flexibility of WordPress. So what does that mean for you? It means saying goodbye to hours of grappling with themes, plugins, or code. It means no more struggling to write compelling content that engages visitors. It means being able to create a first draft website in minutes, not hours. XWEB.HOST's AI-powered platform can create a fully operational first draft website that’s almost ready to publish. It will include popular pages, images, placeholder content, a working contact page and maybe more. All you’ll need to do is add your individual touch. You don’t have to customize anything, but you can customize everything if you want to using simple drag-and-drop tools.
-
Images : AI will generate royalty-free images based on your description, or you can upload your own
-
Themes : AI will generate several professionally designed themes for you to choose from select the one that best matches your vision
How to Point Your Domain to XWEB.HOST
If you purchased your domain from XWEB.HOST, it's already configured.
If not, you can simply update the DNS settings to point to your website's IP address.(XWEB.HOST's DNS Server) These details will be included in your welcome email."
Step 1: Locate Your Website IP Address
Find the IP address in your XWEB.HOST welcome email or control panel.
Step 2: Log In to Your Domain Provider
Go to the registrar where you purchased your domain (e.g., GoDaddy, Namecheap, Google Domains).
Step 3: Access DNS Management Settings
Look for a section like “DNS Settings,” “DNS Zone File,” or “Name Server Management.”
Step 4: Update A Record
Edit the A Record for your domain (usually listed as "@") and point it to your XWEB.HOST IP address.
Step 5:
Save your changes. DNS updates can take a few minutes to several hours to fully propagate.
Step 6: Verify
After propagation, visit your domain to ensure it correctly loads your website hosted on XWEB.HOST
-
SSL certificate : Included for free with all our plans.
-
DNS Management : If you purchased your domain from XWEB.HOST, it's already configured.
Email Marketing Automation
To run your email marketing automation effectively, we first need to properly set up (SMTP) Simple Mail Transfer Protocol the standard protocol for sending emails over the internet, This ensures your emails are sent from your dedicated mailing server rather than directly from your website, reducing server load and improving delivery efficiency.
Find Your Email SMTP Settings
In your dashboard
Step 1 : Go to Mail Settings
In the left sidebar, click Mail.
Click the "Create Email Address" button.
Step 2 : Fill Out Email Details
Email Address: Enter your desired email prefix (e.g., info, support, or yourname).
Choose the domain from the dropdown if you have multiple domains.
Password: Enter a strong password or click Generate to auto-create one.
Optionally, you can:
Set a mailbox size limit.
Enable auto-reply or forwarding later.
Step 3 : Save the Email Account
Click OK or Save to create the email address.
Note down Email SMTP Settings :
In your dashboard
Go to Mail → [Your Email Account].
Note down:
SMTP Host: mail.yourdomain.com or server hostname
Port: 465 (with SSL)
Encryption: SSL
Username: your full email address (e.g., info@yourdomain.com)
Password: your email password
Step 4 : 3. Configure Fluent SMTP Plugin
In WordPress, go to Settings → Fluent SMTP.
Click Add New Connection.
Choose Other SMTP as the mailer.
Enter the Details from Email SMTP Settings
✅ Enable SMTP Authentication:
Username: (Your email)
Password: (Your email password)
Click Save Connection.
-
WordPress SMTP Plugin : Add your SMTP Details and authenticate with your password
Data Analytics and Reporting
We’ve pre-configured your website with a combination of FluentCRM, Funnels, and an Email Marketing Automation plugin. These tools provide a detailed view of user activity and analytics, such as page visits, email opens, and link clicks—giving you a 360-degree view of all interactions from a single dashboard
You can also view reports through the Google Analytics plugin, if it is installed and activated on your website.
How to Set Up Google Analytics for Your WordPress Site
1. Create a Google Analytics Account & Property
Visit analytics.google.com and sign in with your Google account.
Click Admin (gear icon, bottom-left).
Under Account, click Create Account, enter a name, and configure the data-sharing settings.
Under Property, click Create Property, enter your website name, select your time zone and currency, then click Next and complete the setup.
2. Add a Data Stream for Your Website
After creating your property, click Data Streams → Add Stream → Web.
Enter your website URL and stream name.
Click Create Stream to get your Measurement ID (starts with G-XXXXXXX).
3. Install a Google Analytics Plugin in WordPress
Log in to your WordPress dashboard.
Go to Plugins → Add New.
Search for "Google Site Kit", "GA Google Analytics", or "MonsterInsights".
Click Install Now, then Activate.
4. Connect Google Analytics with the Plugin
Option A: Using Google Site Kit
In WordPress, navigate to Site Kit → Settings → Connect More Services → Analytics.
Follow the setup steps: sign in, select your GA account, and choose your Analytics property and data stream.
Site Kit will automatically add the code and start collecting data.
5. Confirm Tracking is Working In your GA dashboard, go to Reports → Real-time. Visit your website from a separate browser or device. You should see at least one active user—verify it from your location. 6. Configure Key Settings Goals & Events: Set up conversions like form submissions or button clicks. Enhanced Measurement: Automatic tracking of scrolls, outbound links, video engagement, etc. Site Search: Enable internal site search tracking if using search functionality.


Removing Complexity
and Saving you valuable time
Empowering your journey with AI
Accelerating business growth through smart digital solutions